
21August 2026
If you’re feeling a draft around your windows or doors, you’ve probably wondered: should I weather strip or caulk? The short answer is that weather stripping is for moving parts, like doors and operable windows, while caulk is for stationary joints that don’t move. But in Ontario’s freeze-thaw climate, choosing the wrong one can mean wasted money, failed repairs, and another cold winter draft.
As a handyman who’s diagnosed and fixed hundreds of drafty homes across Hamilton, Mississauga, Brampton, and the GTA, I’ve seen homeowners make the same mistakes over and over. This post breaks down the real-world differences between weather stripping and caulking, shares a case study from a recent Hamilton job, and gives you the exact steps I use to pick the right solution, every time.
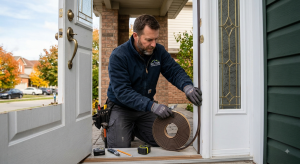
The Core Difference: Moving vs. Stationary Joints
The single most important question to ask before buying any sealant is: does this joint move?
-
Moving joint (like a door that opens and closes, or a window you operate): Use weather stripping. It’s designed to compress, flex, and return to shape as the opening is used.
-
Stationary joint (like the gap between a window frame and your brick or siding): Use caulk. It creates a permanent, flexible seal that bridges gaps between fixed materials.
Putting caulk on a moving door might look fine for a few weeks, but the constant movement will crack it. Conversely, adding weather stripping to a stationary gap won’t solve the underlying leak if the real issue is failed exterior caulking around the frame.
My rule of thumb is simple:
Moving joint = weather stripping
Stationary joint = caulking
Loose or misaligned door/window = fix the underlying issue first
A Real Hamilton Case Study: Why More Weather Stripping Wasn’t the Answer
One of the clearest examples I’ve seen was a two-storey detached home in Hamilton. The homeowner was convinced the draft around their front door was due to old weather stripping. They’d already replaced the door sweep and added adhesive foam tape around the frame, but the draft persisted every time the temperature dropped.
When I inspected it, the weather stripping wasn’t the main problem. The door was slightly out of alignment, leaving a noticeable gap along one upper corner when closed. The exterior caulking around part of the frame had also deteriorated. Essentially, they’d tried to solve a door alignment and stationary-joint problem with more weather stripping.
Here’s what I did:
-
Adjusted the hinges and strike plate so the door closed squarely and compressed the existing weather stripping properly.
-
Removed the failed exterior caulking and resealed the stationary joint around the frame with a high-quality exterior sealant.
-
Replaced only the sections of weather stripping that were genuinely worn.
The result? The door closed evenly, the gaps disappeared, and the draft was gone. More importantly, the homeowner didn’t have to keep layering thicker foam to compensate for an alignment problem. That’s why I always say: don’t buy materials based on where you feel a draft—diagnose where the air is actually getting through first.
My Go-To Materials for Ontario’s Climate
Ontario’s freeze-thaw cycles and humidity expose weak materials fast. I prioritize durability over the cheapest option, especially for exterior work.
Weather Stripping Choices
-
Compression or bulb-style weather stripping: My first choice for exterior doors. It seals well while allowing normal operation.
-
Vinyl or rubber door seals: These hold up better than inexpensive adhesive foam when exposed to weather.
-
Adhesive foam tape: Fine for quick repairs or some windows, but not a long-term solution for heavily used exterior doors. I’ve seen cheap foam compress, peel, or deteriorate after repeated cold and moisture exposure.
-
Door bottoms: I prefer a properly fitted door sweep or adjustable threshold system over layering foam.
Caulking Choices
-
Exterior-grade elastomeric or silicone-based sealants: These handle movement and temperature changes well. I use them for stationary joints around windows, doors, siding, and trim.
-
Avoid basic interior acrylic caulk outdoors: It’s inexpensive and easy to work with, but it won’t hold up to Ontario weather.
-
Brands I trust: DAP, GE, Sika, and OSI all make professional-grade products. But I pay more attention to the specific product’s application and specifications than the logo on the tube.
The products I see underperform most often are inexpensive adhesive foam weather stripping on exterior doors and basic interior acrylic caulk used outdoors. They look great right after installation, but our climate eventually exposes their weaknesses.
How I Explain It to Homeowners: Analogies and Simple Tests
During consultations, I keep it simple: weather stripping is like a gasket—it gets squeezed when the door or window closes and creates a seal, but it can move again when the opening is used. Caulking is more like sealing a permanent crack or joint between two stationary materials.
I also demonstrate the problem rather than just pointing at it. Here are two quick checks I use:
-
The paper test: Close the door on a piece of paper and try to pull it out. If the paper slides out easily, that area may not be getting enough compression from the weather stripping. I test several locations around the frame because a door can seal tightly in one area and have a gap somewhere else.
-
Visual inspection: I look for visible daylight, damaged seals, uneven gaps, and areas where existing weather stripping isn’t making contact. On a windy day, you can sometimes feel the draft immediately.
I don’t rely heavily on candle or open-flame tests—besides the safety issue, moving air from HVAC systems can make results misleading. If necessary, I’ll use something simple like a tissue or lightweight piece of paper to help identify air movement.
The goal is for homeowners to actually see the difference. Once they see where the air is getting through and understand whether that area moves or stays stationary, the choice between caulking and weather stripping becomes pretty straightforward.
One Piece of Advice for First-Time DIYers: Don’t Skip Prep
My biggest piece of advice to a GTA DIYer is: don’t skip the preparation—especially cleaning and removing the old material. A lot of failed weather-stripping and caulking jobs aren’t caused by buying the wrong product; they’re caused by putting a new product over dirt, dust, old loose caulk, or a surface that isn’t properly prepared.
Before starting, I recommend:
-
Find the actual source of the draft first. Don’t assume every gap needs caulk or new weather stripping.
-
Remove old, loose caulking completely rather than simply running a new bead over it.
-
Clean and dry the surface thoroughly. Dust, grease, and moisture can prevent the new sealant or adhesive from bonding.
-
For weather stripping, measure the existing profile and check how the door or window closes before buying replacement material.
-
Don’t make the seal too thick. I’ve seen DIYers add extra foam thinking a tighter seal is always better, only to make the door difficult to close or put unnecessary pressure on the hardware.
-
If you’re caulking, use painter’s tape and tool the bead rather than trying to create a huge bead to cover an uneven joint.
The one thing I’d absolutely avoid is using caulk as a substitute for weather stripping on a moving door or window. It may look like a quick fix, but the movement will eventually crack or separate the caulk.
And for Ontario specifically, pay attention to the temperature and moisture conditions when doing exterior work. Always check the manufacturer’s application requirements rather than assuming you can apply any caulk or adhesive on a cold, damp day.
A little extra time spent diagnosing and preparing the surface can turn a frustrating DIY repair into a job that lasts for years.
Final Thoughts: Diagnose First, Then Seal
Whether you’re tackling a drafty front door in Hamilton, sealing windows in Mississauga, or prepping your home for winter in Brampton, the key is to diagnose first. Identify whether the gap is in a moving or stationary joint, inspect for alignment issues, and choose materials that match Ontario’s climate demands.
If you’re unsure or the problem persists after your DIY attempt, it might be worth calling in a local handyman who can pinpoint the exact source of the leak and apply the right solution. After all, the best seal is the one that lasts—and that starts with knowing the difference between weather stripping and caulking.