
9August 2026
If you have just finished installing tiles, it can be tempting to grout the same day so the project is completed as quickly as possible. However, rushing from tiling to grouting can create problems, especially if the thin-set adhesive has not cured properly.
As a Hamilton handyman, I generally wait at least 24 hours before grouting most standard indoor tile installations. That said, 24 hours is a general guideline, not a guarantee. The right waiting time depends on the type of thin-set, tile, substrate, room conditions, and installation
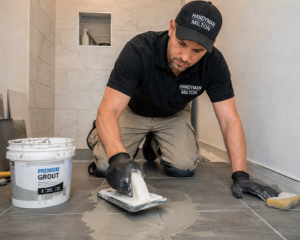
Wait at Least 24 Hours Before Grouting
For many typical indoor projects, waiting approximately 24 hours gives the thin-set enough time to cure and the tiles enough time to become stable.
This applies to many common projects, including:
-
Bathroom floors.
-
Shower and tub walls.
-
Kitchen backsplashes.
-
Entryway floors.
-
Laundry-room floors.
-
Small tile repairs and replacement tiles.
Before grouting, I check that the tiles are firmly set, the thin-set has cured sufficiently, and the joints are clean. If everything looks stable and the product instructions allow grouting after 24 hours, the installation is usually ready to proceed.
However, I never rely on the clock alone. A tile installation that appears ready after 24 hours may need additional curing time if the conditions are cool, humid, poorly ventilated, or otherwise unsuitable for fast curing.
Why 24 Hours Is Not an Absolute Rule
Homeowners often hear that tile should always be grouted after 24 hours. While this is a useful rule of thumb, it does not apply identically to every installation.
The required waiting time can be affected by:
-
The type and brand of thin-set.
-
The size and weight of the tile.
-
Whether the tile is ceramic, porcelain, natural stone, or mosaic.
-
The porosity of the tile and substrate.
-
The temperature and humidity in the room.
-
Ventilation.
-
Whether the tile was installed over concrete, plywood, cement backer board, drywall, or a waterproofing membrane.
-
The thickness of the adhesive beneath the tile.
I always recommend checking the thin-set manufacturer’s instructions first. Different products have different curing requirements, and the manufacturer’s directions should take priority over a general 24-hour guideline.
Large-Format and Porcelain Tile May Need More Time
Large-format porcelain and natural stone tile often require a more cautious approach. These materials can be heavy, and porcelain has a very low absorption rate. When a dense tile is installed over a less-absorbent surface, moisture from the thin-set may take longer to escape.
This does not mean that every porcelain or stone installation requires several extra days. It does mean that the installation should be inspected carefully before grouting.
I may allow additional time when working with:
-
Large porcelain floor tiles.
-
Heavy natural stone.
-
Marble-look porcelain.
-
Tile installed over concrete.
-
Tile installed over waterproofing membranes.
-
Tile installed in a cool or humid bathroom.
-
Tile installed over a surface that does not absorb moisture easily.
If the tiles are still capable of shifting or the thin-set has not cured sufficiently, grouting should wait.
Room Conditions Can Slow Curing
Temperature, humidity, and ventilation can make a noticeable difference in how quickly thin-set cures.
A warm, reasonably dry, well-ventilated room usually allows the adhesive to cure more predictably. On the other hand, a cool bathroom, basement, or poorly ventilated space can slow down the process considerably.
This is particularly important in Hamilton homes during colder or damp weather. Older homes may also have uneven floors, older surfaces, or substrates that require additional preparation before the tile is installed.
When conditions are less than ideal, I do not assume the tile is ready simply because a day has passed. I inspect the installation and allow more time when necessary.
Signs That Tile Is Ready for Grout
Before grouting, look for more than a dry-looking surface. The visible face of the tile may appear completely dry while the thin-set underneath is still curing.
The installation should meet the following conditions:
-
The tiles feel firmly set and do not shift when gently checked.
-
The thin-set has cured according to the manufacturer’s instructions.
-
The grout joints are clean and have enough depth for the grout.
-
No excessive thin-set is squeezing up into the joints.
-
The tile surface is clean and free from adhesive residue.
-
The installation has had enough time to stabilize under the actual room conditions.
If there is any doubt, waiting longer is usually the safer choice.
Clean the Grout Joints Before Grouting
One step that homeowners sometimes overlook is cleaning the grout joints. Any thin-set that has squeezed up between the tiles should be removed while it is still workable or carefully cleaned out before grouting.
The joints need to be clean and deep enough for the grout to be installed properly. If thin-set is left in the joints, the finished grout may look uneven, have inconsistent depth, or fail to perform as intended.
Before starting, inspect the entire tiled area and remove excess adhesive from the joints. Take care not to disturb the tiles while doing this, especially if the thin-set has not fully cured.
A Bathroom Installation That Was Ready After 24 Hours
One bathroom renovation in Hamilton demonstrated how well a standard installation can work when the conditions are right.
I installed porcelain tile over properly prepared cement-based backer board. The bathroom was warm and well ventilated, and I left the installation for approximately 24 hours before returning to grout.
When I came back, the tiles were solid, the thin-set had cured properly, and the joints were clean and ready. The grout went in smoothly and cured without any issues.
In that situation, the 24-hour guideline was appropriate because the substrate had been prepared correctly and the room conditions supported predictable curing.
When Waiting an Extra Day Was the Better Choice
Another project involved a cooler, more humid bathroom with large porcelain tiles installed over a relatively non-absorbent surface.
The homeowner was hoping to finish the project quickly, but when I checked the installation, the thin-set was not sufficiently cured. Rather than grout immediately, I pushed the schedule back and allowed additional curing time.
It was not a dramatic failure, but rushing would have increased the possibility of disturbing the tiles or trapping moisture behind the grout. Waiting an extra day allowed the installation to stabilize and resulted in a much better finished job.
This is why I inspect the installation instead of assuming that every tile job is ready at exactly the same time.
Common Mistakes Homeowners Make
The most common mistake is treating “24 hours” as an absolute rule. It is a helpful starting point, but the actual curing time can vary depending on the materials and conditions.
Other mistakes include:
-
Assuming that a dry-looking surface means the thin-set has fully cured.
-
Grouting before checking whether the tiles are stable.
-
Leaving thin-set in the grout joints.
-
Rushing because of a project deadline.
-
Ignoring the manufacturer’s instructions.
-
Focusing only on the tile and grout instead of the substrate and installation system underneath.
-
Assuming a cool, damp bathroom will cure at the same speed as a warm, ventilated room.
Saving a few hours is not worth compromising the installation. A rushed grout application can contribute to problems that become visible later, including loose tiles, cracked grout, and a poor-looking finished surface.
Proper Preparation Matters as Much as Waiting
The tile itself is only one part of a successful installation. Proper surface preparation, leveling, waterproofing, adhesive selection, and grout selection all affect the final result.
In older Hamilton homes, I often encounter uneven floors, older surfaces, and walls that need additional preparation. If the substrate is not suitable, waiting 24 hours before grouting will not correct the underlying problem.
A durable tile installation starts with:
-
A suitable, properly prepared substrate.
-
Appropriate leveling and surface repairs.
-
Proper waterproofing in wet areas.
-
The correct thin-set for the tile and substrate.
-
Correct tile placement and coverage.
-
Adequate curing time.
-
Clean, properly prepared grout joints.
-
The right grout for the application.
A tile installation is only as reliable as the preparation beneath it.
Should You Wait Longer Than 24 Hours?
You should consider waiting longer than 24 hours when the room is cool, humid, or poorly ventilated, or when you are working with large-format porcelain, natural stone, or a less-absorbent substrate.
You should also wait if:
-
The tiles move when gently checked.
-
The thin-set still appears soft or wet in the joints.
-
The product instructions specify a longer curing period.
-
The installation is over a waterproofing membrane.
-
The adhesive has been applied thicker than usual.
-
You are unsure whether the centre of the tile has cured.
-
The grout joints are not yet clean and ready.
When in doubt, follow the product instructions and give the installation more time. An extra day is generally less costly than repairing a tile installation that was grouted too soon.
Final Advice for Homeowners
For most standard indoor tile projects, waiting at least 24 hours between tiling and grouting is a sensible starting point. But do not grout based solely on the clock.
Check the manufacturer’s instructions, consider the tile and substrate, account for temperature and humidity, inspect the stability of the tiles, and make sure the grout joints are clean. In some installations, especially those involving large porcelain, natural stone, cool temperatures, or high humidity, additional curing time may be necessary.
From my experience as a Hamilton handyman, I would rather explain to a homeowner why we need to wait an extra day than return later to repair loose, cracked, or poorly bonded tile.
If you are unsure whether your tile installation is ready for grout, do not guess. Have an experienced Hamilton handyman inspect it first. Spending a little more time getting the installation right can help prevent loose tiles, cracked grout, and expensive repairs later.